Site map
|
Installation Instructions
|
STEP 1:
|
Adjust and lock hatch lid at 90 degree angle.
|
|
STEP 2:
|
Before setting The Breeze Booster tm over hatch, measure the opening and place the tensioning cords in the set of rod holes that is closest to but less than the dimensions of
the hatch opening. Place a bow knot in the cord after resetting the cord.
|
|
STEP 3:
|
Set The Breeze Booster tm over top of hatch with the bracing
legs placed outside the hatch frame and with the Breeze Booster tm facing into the wind. (Fig. 1)
|
|
STEP 4:
|
Press down on top of the frame, forcing the bows to bulge outward. (Fig. 2) With the other hand place the securing rod through the hatch opening and slowly release the downward pressure on top of the bows to wedge the rod against the cabin ceiling. (Fig. 2 & Fig. 3)
|
|
STEP 5:
|
The length of the tension cords may need to be adjusted at the rod to create the desired oval shape of the Breeze Booster tm opening. This can be done by pulling cord through the rod from below and placing a knot where desired.
|
|
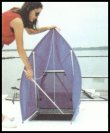
Figure 1
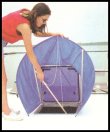
Figure 2
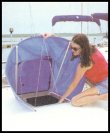
Figure 3
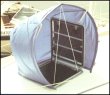
Tension Cords
|
Care & Cleaning
The Breeze Booster tm is made of flag stock nylon which allows the ventilator to fill properly and quietly in the lightest of air, yet withstand a strong wind. This fabric,
DuPont Solarmax, is resistive yet, like all fabrics, vulnerable to the ultra violet rays of the sun. To insure the longest possible life and to preserve the color of your Breeze Booster tm, we recommend the use of 303 Protectant tm, which can be found in most marine catalogs. 303 protectant tm should be sprayed on the entire ventilator and wiped dry at first use and retreated every 30 days of total sun exposure (600 to 800 hours of exposure). Cleaning should be with mild soap and warm water - no chlorine bleach. Treat with 303 Protectant tm after cleaning.
NOTE:
Due to the many configurations of cabins and hatch locations, it may be necessary to modify the securing rod to fit the cabin ceiling (this is why the rod is made of unfinished wood).
If the Breeze Booster tm is used in areas where strong winds are expected, it
may be necessary to place a piece of hook and loop fastener between the rod and cabin ceiling.
If winds get too strong and unsettled, we suggest you take The Breeze
Booster down.
|